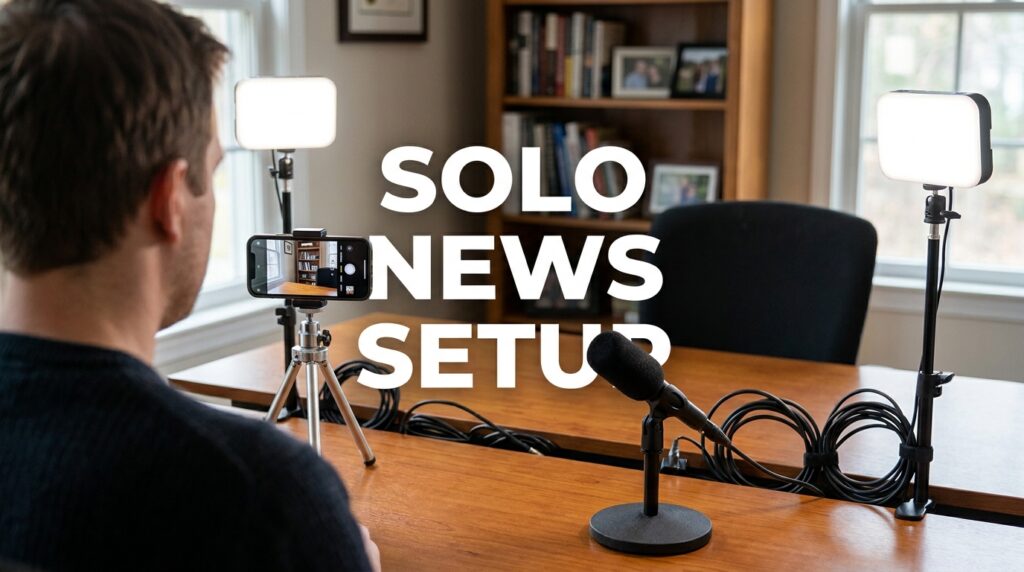
Stop overthinking your equipment. The absolute floor for a broadcast-credible news channel right now requires clean audio, well-lit smartphone video, and free broadcasting software. Most beginner creators fail because they purchase expensive cameras before fixing their room acoustics. Poor audio causes viewer retention to drop rapidly in the first ten seconds. You do not need a Hollywood studio to report the news. You just need a setup that does not distract the viewer from the facts you are presenting.
Phase 1: The Absolute Floor Setup ($0–$300)
This phase relies entirely on hardware you likely already own, supplemented by a few cheap, highly targeted audio and lighting upgrades. The goal here is establishing a clear voice and a clean picture. Do not spend money on a camera yet.
Prioritize Dynamic USB Microphones
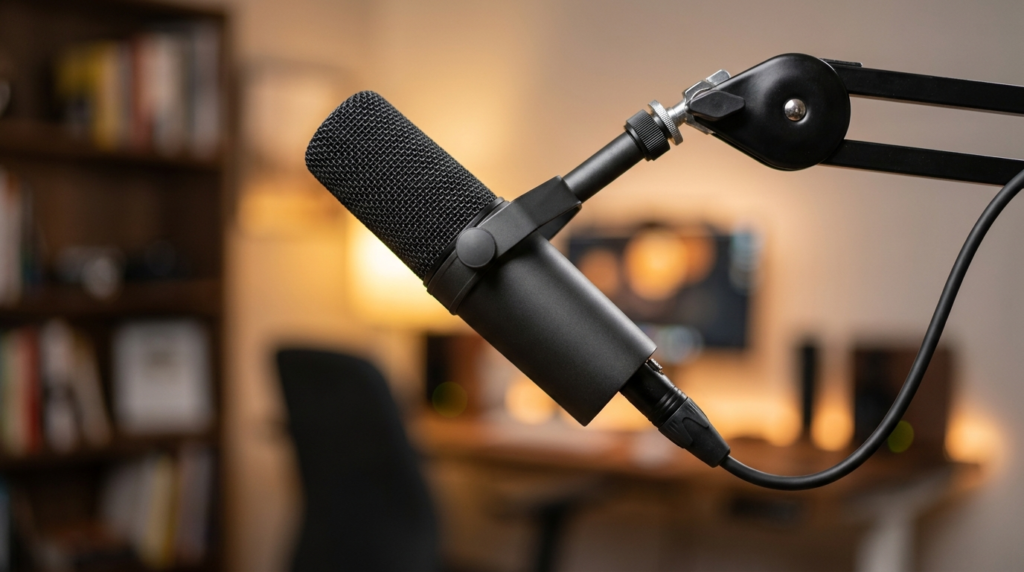
Most beginners buy condenser microphones like the Blue Yeti. This is a massive mistake for solo newsrooms. Condenser mics are too sensitive. They pick up computer fans, keyboard clicks, and the sound of cars driving by outside. You need a dynamic microphone. Dynamic mics reject background noise and only pick up audio directly in front of the capsule.
The standard baseline choice here is the Audio-Technica ATR2100x-USB or the Samson Q2U. Both cost under $80. They plug directly into your computer via USB. Keep the microphone two to three inches from your mouth. Angle it at 45 degrees to avoid plosives, which are the harsh bursts of air from “P” and “B” sounds.
Smartphone Rigs and Lighting Basics
Your current smartphone has a better image sensor than most cheap webcams. An iPhone 13 or a Google Pixel 6 provides a broadcast-quality image if you light the scene correctly. Always use the rear-facing camera, not the selfie camera. The rear sensor is significantly larger and captures much more detail.
Lighting is where you create a professional look. Do not rely on overhead ceiling lights or an open window that changes brightness every ten minutes. Buy a basic two-point LED lighting kit. Neewer sells desktop LED panels for around $50. Place your main light 45 degrees to your left or right. Elevate it slightly above your eye level and angle it down.
Phase 1 Equipment Breakdown
| Gear Category | Specific Model Recommendation | Estimated Cost | Why It Works |
| Audio | Audio-Technica ATR2100x-USB | $79 | Dynamic capsule rejects room echo. USB/XLR combo allows future upgrades. |
| Video | Existing Smartphone | $0 | High-resolution rear sensor. Avoids webcam compression artifacts. |
| Lighting | Neewer 2-Pack Dimmable USB LED | $45 | Consistent illumination. Eliminates grainy shadows on the smartphone sensor. |
| Software | OBS Studio | $0 | Industry standard for recording. Handles screen sharing and lower thirds. |
Phase 2: Building Broadcast Credibility ($300–$800)
Once your channel starts generating consistent views, you need to upgrade your workflow. Fumbling with a smartphone on a tripod becomes annoying when you produce news daily. Phase 2 introduces dedicated cameras and audio interfaces. This setup allows for faster file transfers and better depth of field.
Stepping Up to Entry-Level Mirrorless
You need a camera that can record for long periods without overheating. It also needs a “clean HDMI out” feature. This means the camera can send a video signal to your computer without showing the battery icons or focus boxes on the screen.
The Sony ZV-E10 and the used Panasonic Lumix G85 are standard baseline models for this tier. You can often find a used G85 with a kit lens for around $400. You will also need a capture card to connect the camera to your computer. The Elgato Cam Link 4K is reliable, but a generic $15 USB capture card from Amazon works perfectly fine for a 1080p news broadcast.
Audio Interfaces and XLR Workflows
USB microphones are great for starting out, but XLR cables offer cleaner audio signals and less electronic interference. You do not have to throw away your Phase 1 microphone if you bought the ATR2100x or Q2U, as they have both USB and XLR outputs.
To use an XLR connection, you need an audio interface. The Focusrite Scarlett Solo costs around $90. You plug your microphone into the interface with an XLR cable, and the interface connects to your computer via USB. Set your interface gain dial so your speaking voice hits -12dB on your recording software meter. This leaves enough headroom so your audio does not distort if you suddenly speak louder.
Controlled Studio Lighting Configurations
Small LED panels create harsh shadows. To get a soft, professional look similar to major networks like Vox or Vice, you need a larger light source. The Amaran 60d is a dedicated video light that costs around $160. Pair it with a cheap 30-inch softbox. A softbox diffuses the light, wrapping it smoothly around your face and hiding skin imperfections.
Phase 2 Equipment Breakdown
| Gear Category | Specific Model Recommendation | Estimated Cost | Why It Works |
| Camera Body | Used Panasonic Lumix G85 | $400 | Unlimited recording time. Clean HDMI output for live capture. |
| Capture Card | Generic USB HDMI Video Capture | $15 | Converts camera HDMI signal into a webcam feed for OBS. |
| Audio Interface | Focusrite Scarlett Solo | $90 | Clean preamps. Allows precise physical control over microphone levels. |
| Lighting | Amaran 60d + Softbox | $200 | Provides a massive, soft light source. Lowers camera ISO requirements. |
Phase 3: The Professional Solo Newsroom ($800–$2,000)
At this stage, your channel is generating revenue. The focus shifts entirely to efficiency and premium presentation. You want the highest possible image quality and a workflow that allows you to read scripts flawlessly while looking directly into the lens.
Advanced Mirrorless and Interchangeable Lenses
The kit lenses that come with entry-level cameras are usually slow. This means they do not let in much light, and they keep everything in the background perfectly in focus. A busy background distracts the viewer from your news reporting.
You need a fast prime lens. If you are using a Sony APS-C camera like the a6700 or ZV-E10, the Sigma 16mm f/1.4 is the industry standard. It costs around $400. Set the aperture to f/2.0. This setting keeps your face tack-sharp while gently blurring the background. It instantly makes your footage look expensive.
Broadcast-Grade Audio Processing
You have likely seen the Shure SM7B in almost every major podcast or solo broadcast setup. It costs $399. It is heavily shielded against electromagnetic hum from computer monitors. It provides a deep, rich vocal tone.
However, the SM7B requires a massive amount of gain. Most budget audio interfaces cannot power it alone. You will need an inline preamp like a Cloudlifter or a FetHead, which costs an additional $150. Alternatively, you can buy an interface with high-gain preamps built-in, like the Vocaster Two or the Rodecaster Duo.
Teleprompter Integration and Workflow
Reading news off a monitor placed below your camera makes you look disconnected from the audience. A teleprompter allows you to read your script while maintaining direct eye contact with the viewer.
The Desview T3 teleprompter costs under $100. It attaches directly to the front of your camera lens. You slide an iPad or a cheap Android tablet into the bottom tray. Use an app like PromptSmart. This software uses voice recognition to automatically scroll the text at your natural speaking pace. You never have to mess with a remote control while presenting.
Phase 3 Equipment Breakdown
| Gear Category | Specific Model Recommendation | Estimated Cost | Why It Works |
| Lens Upgrade | Sigma 16mm f/1.4 DC DN | $400 | Creates professional background blur. Thrives in low-light environments. |
| Microphone | Shure SM7B | $399 | Industry-standard broadcast tone. Excellent off-axis noise rejection. |
| Mic Preamp | Cloudlifter CL-1 | $150 | Provides 25dB of clean gain required by the SM7B. |
| Teleprompter | Desview T3 + Existing Tablet | $100 | Maintains direct eye contact. Voice-activated scrolling speeds up workflow. |
Crucial Compatibility Checks for Beginners
Many beginner creators waste money buying gear that refuses to work together. A solo newsroom must function flawlessly every time you hit record. You cannot spend an hour troubleshooting tech issues when breaking news happens.
Avoiding the USB Mic to Camera Trap
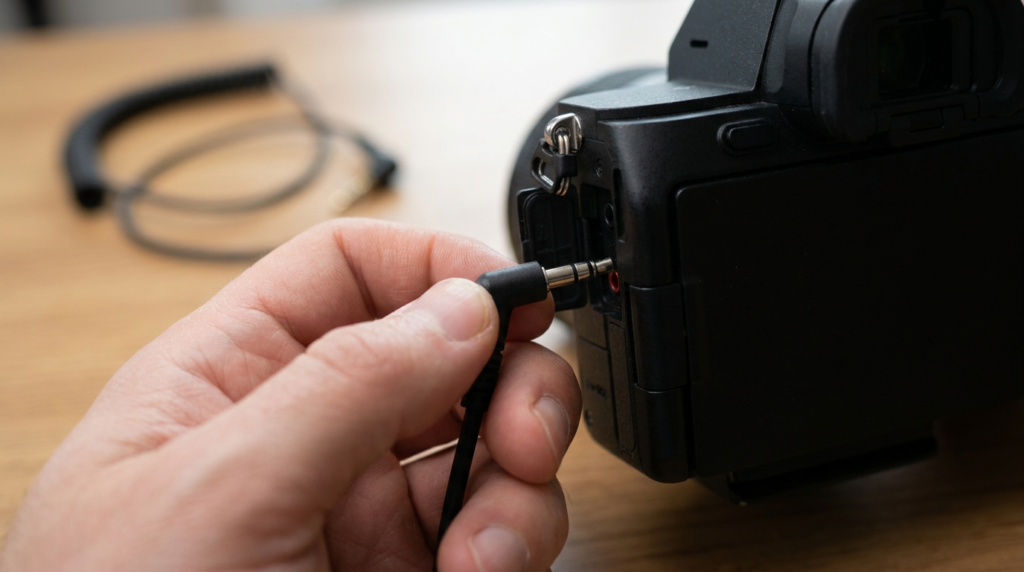
A common mistake is buying a USB microphone and trying to plug it directly into a mirrorless camera. Cameras do not accept USB audio inputs. They only accept 3.5mm analog audio jacks. If you want to record audio directly into your camera to save time on syncing in post-production, you must use a microphone with a 3.5mm output, like the Rode VideoMic NTG.
If you use a USB microphone, you must record the audio into your computer using software like Audacity or OBS. You then clap your hands once at the beginning of your video to create a visual and audio spike. You line up the clap in your video editing software later to synchronize the separate audio and video files.
Frame Rates and Audio Sync in OBS
When you route a mirrorless camera into OBS Studio through a capture card, the video signal takes longer to process than your USB microphone audio. If you do not fix this, your audio will play a fraction of a second before your lips move on screen.
You must add a delay to your microphone. In OBS, click the gear icon next to your audio mixer. Select “Advanced Audio Properties.” Find your microphone source. Type in an “Sync Offset” value. The standard baseline for a 1080p capture card is usually between 150ms and 200ms. Record a test video of yourself clapping to verify the timing is perfectly locked.
The Realities of Room Treatment
Buying a $400 microphone will not fix a terrible-sounding room. If your home office has hardwood floors and bare walls, your audio will sound hollow. Sound waves bounce off hard surfaces and enter the microphone milliseconds after your actual voice.
You do not need to buy expensive acoustic foam. Moving blankets cost $15 each. Hang them on the walls outside of the camera frame. Put a thick rug on the floor under your desk. If your room is still echoing, fill the space with soft furniture like a heavy couch or bookshelves packed tightly with books. These items break up the sound waves and create a tight, controlled audio environment for your news reads. The fastest way to elevate your production value is not spending another thousand dollars on gear, but mastering the equipment you already have connected.